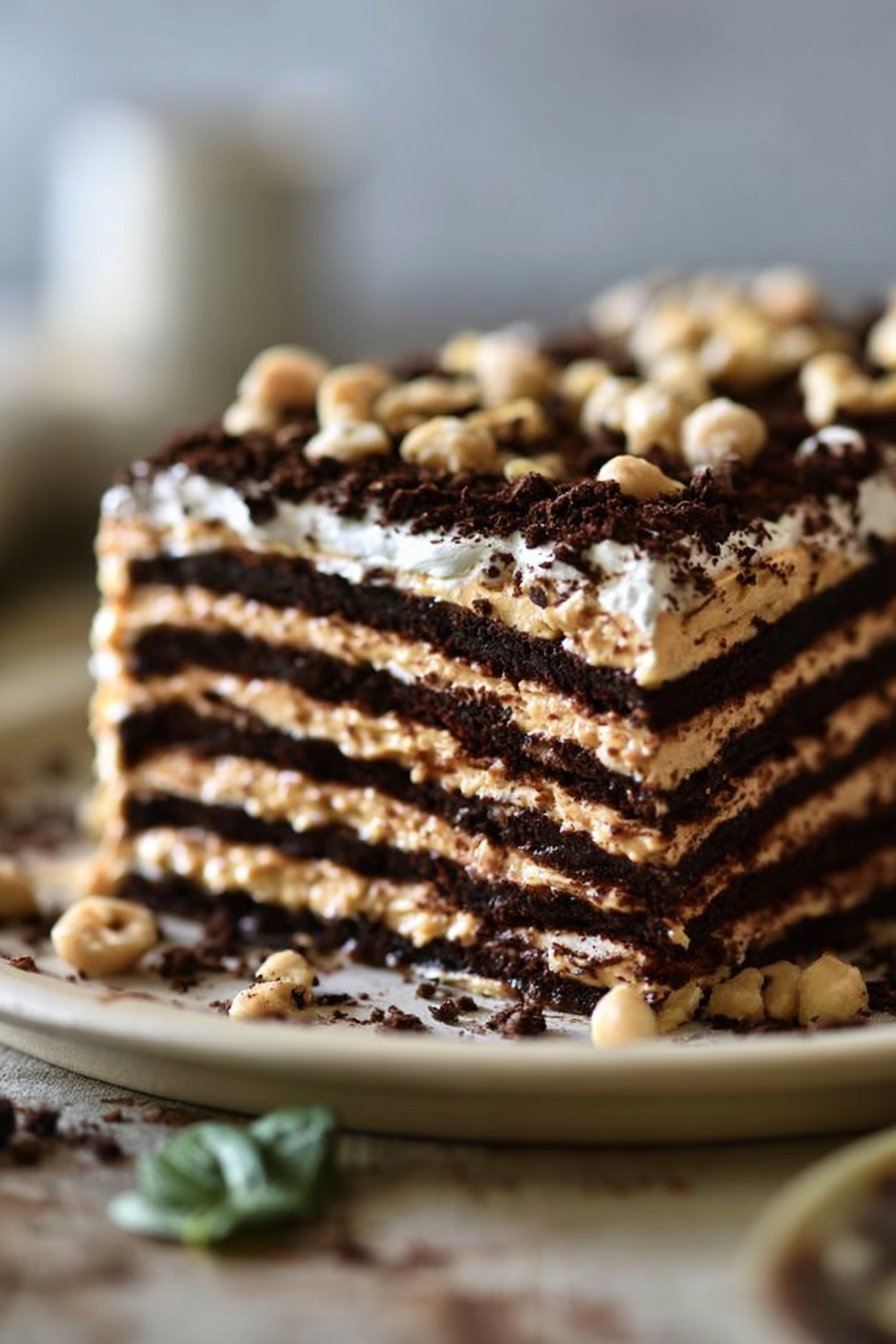
Chocolate Peanut Butter Icebox Cake is an irresistible dessert that combines the rich, creamy flavors of chocolate and peanut butter into a smooth and decadent treat. Perfect for hot summer days or any occasion that calls for a sweet celebration, this no-bake cake is not only easy to assemble but also provides a delightful explosion of textures and flavors that will have your friends and family reaching for seconds (or thirds!).
Imagine layers of creamy peanut butter filling with crunchy chocolate wafers, all wrapped up in the most satisfying way. You’ll love the ease of preparation in this dessert, allowing you to spend less time in the kitchen and more time enjoying it with loved ones. With its delightful sweetness and rich flavors, this Chocolate Peanut Butter Icebox Cake is bound to become a favorite in your recipe repertoire.
Why You’ll Love This Recipe
- No-Bake Convenience: This icebox cake requires no baking, making it an excellent option for those hot days when you want something sweet without turning on the oven.
- Decadent Flavor: The combination of rich chocolate and creamy peanut butter creates a flavor sensation that is hard to resist. It’s a crowd-pleaser for all ages!
- Make-Ahead Delight: You can whip this cake up a day in advance, allowing the flavors to meld while you prepare for other tasks or enjoy your time with friends and family.
- Textural Variety: The creamy filling contrasts beautifully with the crunchy chocolate wafers, offering a delightful textural experience in every bite.
- Versatile Toppings: You can customize the toppings to fit any occasion or personal taste. Think crushed cookies, nuts, or even fresh fruit!
What Makes This Recipe Special
This Chocolate Peanut Butter Icebox Cake is special not only for its combination of flavors but also for its delightful—and totally customizable—texture. The base is made with cream cheese and smooth peanut butter, lending a creamy richness to the filling. The addition of whipped heavy cream lightens the mixture, resulting in a luscious yet airy consistency that perfectly complements the crunchy layers of Nabisco Famous Chocolate Wafers.
With the pinch of salt enhancing the sweetness, and the cocoa powder dusting adding a touch of elegance, each bite is a harmonious blend of flavors that will keep you coming back for more. This dessert stands out for its simplicity and the ability to please a crowd, making it the perfect choice for parties, picnics, or just quiet evenings at home.
Ingredients
- 4 oz cream cheese, at room temperature
- 1 cup smooth peanut butter
- 1 cup confectioners’ sugar
- 2 teaspoons vanilla extract
- Pinch salt
- 2 cups cold heavy cream
- 50 Nabisco Famous Chocolate Wafers
- Cocoa powder, for dusting
- 1/4 cup unsalted dry roasted peanuts
Ingredient Notes and Easy Substitutions
- Cream Cheese: Ensure it’s at room temperature for easier mixing. If you prefer a lighter option, you can try using reduced-fat cream cheese.
- Peanut Butter: Smooth peanut butter works best for a creamy texture. Crunchy peanut butter can also be used for extra texture and flavor.
- Confectioners’ Sugar: This adds sweetness and helps stabilize the whipped cream. If you’re looking for a less sweet option, consider reducing the amount slightly.
- Chocolate Wafers: While Nabisco Famous Chocolate Wafers are traditional, you can substitute with any chocolate cookie or biscuit that holds its shape well.
- Heavy Cream: Cold heavy cream whips beautifully and provides the best texture. If you’re looking for a non-dairy option, coconut cream is a great substitute that adds its own unique flavor.
Instructions
-
Line a 9 x 5-in loaf pan with overlapping plastic wrap. This will help you easily remove the cake later on.
-
In a large mixing bowl, whip the heavy cream using a mixer on medium-high speed until stiff peaks form. This may take a few minutes, so be patient!
-
In a separate bowl, combine the cream cheese, peanut butter, confectioners’ sugar, vanilla extract, and a pinch of salt. Beat until the mixture is smooth and well combined.
-
Gently fold one-third of the whipped cream into the cream cheese mixture. This helps lighten the mix. Then, gradually fold in the remaining whipped cream until fully incorporated. Be careful not to deflate the whipped cream; you want to maintain that light texture.
-
Spoon two-thirds of the cream mixture into the prepared loaf pan, smoothing it out evenly.
-
Arrange the Nabisco Famous Chocolate Wafers upright along the sides and middle of the pan, standing them on their edges in rows—this creates those beautiful layers.
-
Cover the cookies with the remaining cream mixture and smooth the top.
-
Cover the pan with plastic wrap and refrigerate overnight—or at least for 4-5 hours—to allow the cake to set properly.
-
When you’re ready to serve, invert the pan onto a platter. Remove the plastic wrap and dust the top with cocoa powder. Scatter crushed wafers and dry roasted peanuts on top for added texture and decoration.
Expert Tips for the Best Results
- Chill Your Gear: For a better whipped cream consistency, chill your mixing bowl and beaters before whipping the cream.
- Timing: Allow the icebox cake to chill overnight. This is critical for the flavors to meld together and the texture to set properly.
- Presentation: When serving, consider using a sharp knife warmed in hot water for clean slices that showcase those beautiful layers.
- Texture Check: If the cream cheese mixture is too thick, you can thin it out slightly with a splash of milk to ensure easier spreading.
Variations
- Chocolate Ganache Layer: Drizzle a layer of chocolate ganache over the top before serving for an extra chocolate kick.
- Nutty Delight: Incorporate chopped nuts, like walnuts or almonds, directly into the cream mixture for a nutty twist.
- Flavor Fusion: Substitute the peanut butter with cookie butter or almond butter for a unique flavor profile.
- Minty Fresh: Add a few drops of peppermint extract to the cream mixture for a refreshing take on the classic flavor palette.
- Fruit Layer: Add thin slices of bananas or strawberries between the cookie layers for a fruity flair.
Serving Suggestions
This Chocolate Peanut Butter Icebox Cake can stand beautifully alone, but it’s also fabulous paired with a dollop of whipped cream, a scoop of vanilla ice cream, or fresh fruit like raspberries or strawberries for a complementary tartness. A steaming cup of coffee or cold glass of milk makes for the perfect beverage pairing. If you want to elevate it even further, you can drizzle with melted chocolate or add more crushed nuts on top.
Storage and Reheating
Store any leftovers in an airtight container in the refrigerator for up to 3 days. Due to its creamy texture, this cake does not freeze well, as it may alter the consistency upon thawing. However, it is an excellent make-ahead dessert, as preparing it a day early will actually improve the flavors and make it easier to slice.
Common Mistakes to Avoid
- Overwhipping the Cream: Be cautious not to overwhip the heavy cream, as it can turn grainy and may not incorporate well with the cream cheese mixture.
- Rushing the Chill Time: Trying to serve it before enough chilling time can lead to a cake that doesn’t hold its shape well, potentially causing it to collapse.
- Not Using Room Temperature Ingredients: Using cold cream cheese can result in lumps in your filling mixture. Make sure it’s brought to room temperature for a smooth blend.
FAQ
Can I use crunchy peanut butter instead of smooth?
Yes, crunchy peanut butter will add a nice texture to your cake, giving it an extra crunch.
How do I know when the whipped cream is ready?
Whipped cream is ready when it forms stiff peaks. This means that the cream can hold its shape when you lift the whisk or beaters.
Can I make this cake in advance?
Absolutely! This cake is ideal for make-ahead desserts. Just prepare it the day before you plan to serve, allowing it to set in the refrigerator overnight.
What is the best way to slice this cake?
For clean slices, use a warm knife. Dip the knife in hot water, wipe it dry, and slice through the cake for pretty layers without tearing.
Can I freeze the Chocolate Peanut Butter Icebox Cake?
It’s not recommended to freeze this icebox cake as the texture of the whipped cream and cream cheese may change when thawed.
How can I store leftovers?
Keep any leftovers in an airtight container in the refrigerator for up to 3 days for the best flavor and texture.
Conclusion
Indulging in a slice of Chocolate Peanut Butter Icebox Cake is pure bliss, wrapping you in the comforting flavors of childhood and sweet nostalgic memories. Whether you’re serving this delightful creation for a special occasion or just craving a simple treat at home, its appealing layers and rich taste are sure to impress everyone at the table.
We encourage you to give this recipe a try, and you’ll quickly see why it has earned its place as a favorite dessert. Don’t forget to share it with your friends and family—or save it for a special moment; trust us, you’ll want to keep this one close!
Chocolate Peanut Butter Icebox Cake
Ingredients
Method
- Line a 9 x 5-in loaf pan with overlapping plastic wrap for easy removal later.
- In a large mixing bowl, whip the heavy cream until stiff peaks form.
- In another bowl, combine cream cheese, peanut butter, confectioners’ sugar, vanilla extract, and a pinch of salt. Beat until smooth.
- Gently fold one-third of the whipped cream into the cream cheese mixture, then gradually fold in the remaining whipped cream.
- Spoon two-thirds of the cream mixture into the prepared loaf pan, smoothing it out evenly.
- Arrange the chocolate wafers upright along the sides and middle of the pan.
- Cover the cookies with the remaining cream mixture and smooth the top.
- Cover with plastic wrap and refrigerate overnight or for at least 4-5 hours.
- When ready to serve, invert the pan onto a platter. Remove plastic wrap and dust the top with cocoa powder.
- Sprinkle crushed wafers and peanuts on top for added decoration.